How-To: Your own dynamic DNS server (with PowerDNS & a MySQL backend)
Contents
I was using dyndns.org and no-ip.com for a long time, and because I’m too cheap to buy the premium version for a simple service like this, I finally decided to set up my own dynamic DNS server for my various systems.
This is a short tutorial describing how I did it. It’s really not rocket science, so don’t expect too much.
1. Requirements
You need:
A publicly accessible server with root access
A domain and control to delegate DNS zones
About 30min of set up time
In this example/post:
Our new DNS server will be at 99.88.77.66
Its name will be dyndns.ns.heckel.xyz
The new dynamic DNS zone will be named dyndns.heckel.xyz
2. Install PowerDNS & MySQL
Assuming that you’re running Ubuntu 16.04+, install MySQL (apt install mysql-server), then install PowerDNS as per instructions on their repo site. Note that the Ubuntu 16.04 upstream version is broken, as per this issue, so be sure to install at least version 4.0.1.
Then install the PowerDNS MySQL backend via apt install pdns-backend-mysql.
If everything goes as planned, this will set up the pdns database for you automatically (including user and password), so you don’t have to manually do that. If that does not happen, configure it in /etc/powerdns/pdns.d/pdns.local.gmysql.conf, so that it looks something like this:
launch+=gmysql

gmysql-host=localhost
gmysql-port=
gmysql-dbname=pdns
gmysql-user=pdns
gmysql-password=supersecretpass
gmysql-dnssec=yes
Once you’ve configured it, you may want to start the service to see if it is working (systemctl start pdns.service). Given that it is not properly configured with a zone, it may actually fail here. Check journalctl -u pdns.service for details.
3. Add your DNS zone
With the MySQL backend, you can configure your zone completely via SQL tables (duh!). For our dynamic DNS server, the only relevant tables are pdns.domains and pdns.records. If you want to know more about the other tables, a detailed documentation of the schema and plugin can be found on the PowerDNS plugin documentation page.
For this example, we’re configuring dyndns.heckel.xyz as our DNS zone, so let’s add this domain to the pdns.domains table:
Inserting the DNS zone we want to use for the dynamic DNS server
INSERT INTO pdns.domains SET id=1, name='dyndns.heckel.xyz'
Once we’ve done this, the pdns.domains table should look like this (assuming you’re looking at it via phpMyAdmin):

If you know DNS, you know that there are different types of records that can be added to a zone. Our dynamic DNS zone is pretty simple. We just need two records to get started. Let’s add a SOA record to declare that this server is authoritative for our dynamic DNS domain (here: dyndns.heckel.xyz) and our first dynamic A record (here: let’s assume our home network’s public IP address is 12.11.121.221):
Inserting the SOA record for the DNS zone and a first dynamic record
INSERT INTO pdns.records SET
  domain_id=1,
  name='dyndns.heckel.xyz',
  type='SOA',
  content='dyndns.ns.heckel.xyz noreply.heckel.xyz 1483141082 60 60 60 60',
  ttl=60,
  change_date=unix_timestamp();

INSERT INTO pdns.records SET
  domain_id=1,
  name='dyndns.heckel.xyz',
  type='A',
  content='12.11.121.221',
  ttl=60,
  change_date=unix_timestamp();
If you add other A records, this may look like this:
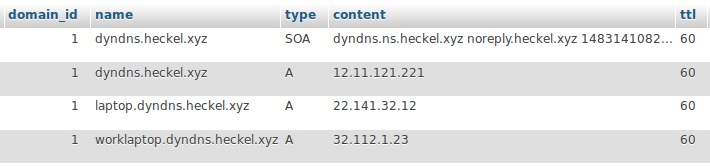
Side note: PowerDNS looks at the change_date column (not shown in screenshot) to determine whether its cache needs to be updated. Be sure to always update that column if you change a record, and also always update the SOA record serial (third part of the record, see above ... 1483141082 ...) when anything in the zone has changed. You’ll get outdated/invalid results if you don’t do this.
That’s all you need to configure PowerDNS. After restarting the service (systemctl restart pdns), you should be able to query the DNS server for the two records that you added:
Querying the DNS server locally for the two records we added
$ dig SOA dyndns.heckel.xyz @localhost +short
dyndns.ns.heckel.xyz. noreply.heckel.xyz. 1483141082 60 60 60 60

$ dig A dyndns.heckel.xyz @localhost +short
12.11.121.221
4. Delegating the domain
So far we can only verify that our zone works locally, but we haven’t made the dynamic DNS domain known to the world. If you ask for any domain *.dyndns.heckel.xyz via DNS, the nameserver of your domain will still feel responsible. To tell it to delegate all requests for dyndns.heckel.xyz to the our server dyndns.ns.heckel.xyz (aka 99.88.77.66), we need to change some records in our domain’s DNS entries.
My domain is hosted with Hosteurope, so I had to log into their domain management system and add two entries:
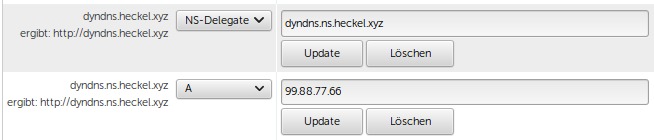
The two records you see are to map an IP address to the DNS server domain (dyndns.ns.heckel.xyz A 99.88.77.66) and to actually delegate the subdomain to this DNS server (dyndns.heckel.xyz NS dyndns.ns.heckel.xyz).
Once these records are live (this may take a few hours), you should be able to resolve queries for the zone from any computer. It’s easiest to do this via the requests we ran before, but this time run it from your workstation (instead of the server itself):
Querying the DNS server from a workstation
$ dig SOA dyndns.heckel.xyz +short
dyndns.ns.heckel.xyz. noreply.heckel.xyz. 1483141082 60 60 60 60

$ dig A dyndns.heckel.xyz +short
12.11.121.221
5. Updating the DNS zone regularly
Now that the zone is live and can be queried from anywhere, all you need to do is keep it up-to-date. How you do that is of course up to you. I’ve set up a JSON-RPC API on my server (I also wrote a guide on how to do that) and I’m updating it through that.
Each of my clients/machines runs a simple script every 2 minutes in a cron job:
Updating the host IP address in a cronjob
#!/bin/bash
curl \
  -u worklaptop:supersecretkey \
  -d '{"jsonrpc":"2.0","id":1,"method":"hosts/update","params":{"host":"worklaptop"}}' \
  https://heckel.xyz/api.php
On the server, the API endpoint essentially runs these two queries for every host update request:
Updating the records table on the server side
$dbh = new PDO(...);

// Update A record for '<host>.dyndns.heckel.xyz'
$stmt = $dbh->prepare("
    update records
    set change_date=unix_timestamp(), content=:content
    where type='A' and name=:name
");

$stmt->execute(array(
    'name' => "$host.dyndns.heckel.xyz",
    'content' => $_SERVER['REMOTE_ADDR']
));

// Update SOA record timestamp for 'dyndns.heckel.xyz'
$serial = time();
$dbh->query("
    update records
    set change_date=unix_timestamp(), content='dyndns.ns.heckel.xyz noreply.heckel.xyz $serial 60 60 60 60'
    where type='SOA' and name='dyndns.heckel.xyz'
");
That’s essentially it. Your dynamic DNS server is ready to be used. PowerDNS really makes things incredibly easy for us. As always, leave notes and questions in the comments section.